
The Deadlift: Unveiling Common Flaws and Their Remedies
The deadlift, often regarded as the ultimate test of strength, pits you against a loaded barbell in a one - on - one contest to hoist it from the floor. It is a lift that I not only enjoy performing but also take great pleasure in coaching.
At first glance, the deadlift seems straightforward: bend over, grip the bar, and lift. However, more often than not, I find myself wincing rather than applauding when observing deadlifts, whether online or at competitions. A multitude of lifters execute this lift with a risky approach, teetering on the brink of a herniated disc due to improper technique.
In this article, we will delve into three prevalent flaws in lifting approach, setup, and deadlift technique. These errors are impeding your progress and preventing you from adding more weight to the bar. I will provide you with solutions for each, not only to enhance your lifting capacity but also to ensure you do so safely.
Flaw #1: Standing Too Far Away
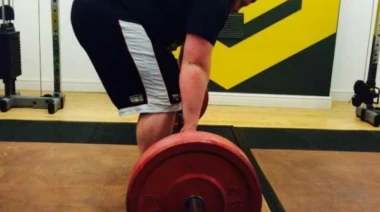
If you're struggling with failed lifts at the knees and feel as though you're being pulled forward, take a moment to glance down before gripping the bar. How close are your shins to it?
A significant gap between your shins and the bar before initiating the lift places you at a biomechanical disadvantage. The bar is not positioned over your center of mass, effectively making it feel heavier. Consider the difference in holding a twenty - kilo plate against your chest versus at arm's length; the latter feels heavier, right? So, why subject your deadlift to the same inefficiency?
Illustration:
Left: Incorrect - bar away from shins
Right: Correct - bar close to the body
If you're unable to bring your shins close to the bar, ankle mobility is likely the culprit. This is a common cause of failed lifts, leading to:
The weight pulling you forward onto your toes.
Inability to engage your glutes effectively.
Difficulty in driving your hips through.
Cure: Stretch Out the Tibialis Anterior
I've previously discussed the importance of this remarkable muscle in relation to a stronger squat, and it's equally relevant to your deadlift. You need to be able to perform dorsiflexion (where your shins move towards your toes).
The tibialis anterior runs down the side of the shin and attaches to the first metatarsal of the foot. It plays a crucial role in controlling dorsiflexion but often becomes tight, restricting your range of motion in both squats and deadlifts. Many people overlook this thin muscle alongside the shin, yet its tightness can limit your movement.
Stretching Technique:
Kneel on the floor with your feet and toes flat.
Lean back to sit on your heels, and then lean further back. You'll feel a stretch in your ankles and shins. Hold for ten seconds, then sit forward. Repeat three times, stand up, and note the difference.
Flaw #2: Lack of Tension Through the Upper Back
Some powerlifters advocate minimal tension in the upper back and shoulders, arguing that it reduces the range of movement during the lift, significantly shortening the lockout. While this may be true for highly advanced lifters, for the majority, this lack of tension leads to a severely rounded lumbar and thoracic spine even before the bar is lifted. This is poor spinal positioning and poses a serious injury risk.
As the saying goes, "If your back is severely rounded, you're at a biomechanical disadvantage and are not properly involving your legs in the lift."
You should utilize your lats and upper back to stabilize, support, and align the spine as it was intended. This ensures you're not on a fast - track to the medical room for a herniated disc. I'm not merely referring to squeezing your shoulder blades together; I mean creating a stiff and rigid upper back to support your spine. Champion powerlifter Andy Bolton aptly terms this a "lat lock."
Warning: Avoid taking a rounded upper back to extremes.
A severely rounded back places you at a biomechanical disadvantage, preventing proper leg involvement in the lift. Consider the combined weight - moving potential of your quads, hamstrings, and glutes, along with their muscle mass. Starting the lift with a rounded back disengages your legs, forcing you to rely solely on your lower back.
Cure: Squeeze the Bar Mercilessly, Lock Your Lats
Try this: squeeze your lats and engage your rhomboids. Done? Now, rest and remember that feeling.
Then, make a fist, not a weak one but a vice - like grip as if you're trying to crush a granite block. Seriously squeeze your hand. Now, squeeze your lats and engage your rhomboids again. Notice the difference? It's quite palpable. Merely holding the bar or applying minimal pressure to your lifting straps forfeits a significant opportunity to engage your upper body, create a stable and locked trunk, and achieve a stronger deadlift.
The solution is simple: when approaching the bar, squeeze it with all your might, tighten your lats, and feel your rhomboids engage.
Flaw #3: Not Taking the Tension Out of the Bar
"Grip and Rip." If you own a t - shirt emblazoned with this, I suggest burning it immediately as a reminder to never yank on the bar. All bars, whether an expensive deadlift - specific bar or a standard gym bar, will flex and bend under tension. This means that failing to take the tension out of the bar results in it working against you. Additionally, you won't be generating maximal tension in your body.
If you haphazardly rip the bar off the ground, you'll be halfway through your movement before the bar actually starts to move. All you'll have accomplished is removing the flex from the bar. By the time the bar begins to move, your hips are high, your shoulders are over the bar, and the rep becomes a struggle.
Failing to create tension in your body also squanders a great deal of your potential to exert maximal force during the lift. Consider this: place the tip of your index finger against the tip of your thumb and exert maximal force as if flicking something. Swiftly move your thumb away and note the speed of your finger. Now, repeat the motion without using your thumb, extending your finger as fast as possible without pre - loading. Notice how much slower it is? The finger extension time is less than one second, and without pre - loading, you can't apply maximal force, resulting in a slower extension.
The same principle applies to the deadlift. A fast and powerful pull can be as quick as one second. If you're not pre - loading your muscles for maximal power output, you're missing a crucial aspect (and a lot of power).
Cure: Create Tension and Take Tension
Once you've implemented the first two remedies, you're in a better biomechanical position and have created upper - body tension. Now, it's time to extend this process throughout the rest of your body. You must prepare to release the accumulated tension as maximal force during the pull.
Steps:
- Load your glutes, hamstrings, and quads in preparation for the pull and remove the flex from the bar. The simplest way to do this is to push your hips into the bar before pulling. As you firmly grip the bar, contract your glutes to push your hips towards the barbell. You'll observe the barbell flex and feel your entire lower body engage, ready to release the stored tension.
Summary
With a better biomechanical position, an engaged torso, and lower - body tension, you're primed to lift. Remove the flex from the bar, drive your heels firmly into the floor, and push the ground away from you. Your hips won't shoot up, your back won't dangerously round or sag, and you'll experience a powerful lockout. The bar will move faster than ever before.
Related Articles:
3 Reasons You Don’t Squat More (And What to Do About It)
15 Practical Strategies to Increase Your Deadlift Max
The 25 Rules of Strength Training (Part 2)
What’s New on Breaking Muscle Today
The 3 Most Common Deadlift Errors and How to Fix Them
•
Author: Kelton
•
Fitness
Life
Share this article